Today, we’ll be diving into an insightful tutorial on a common issue faced by hobbyists – how to separate shrimp from plants in your aquarium.
As hobbyists, we understand the importance of maintaining the right ecosystem for our shrimp. However, when our aquatic plants start growing unchecked, it can begin to impact the tank’s overall health. It’s not just the aesthetics; overgrown plants can inhibit light, affecting the growth of other flora and fauna. It also becomes challenging to spot and monitor our shrimp amid the dense greenery. So, the question is, how do we manage our tank’s plant life without harming our precious shrimp, especially the tiny ones that are often hard to see?
In response to the overwhelming inquiries from our community, I’ve decided to share my method. It’s simple, effective, and ensures the safe handling of your shrimp during the process. So let’s jump right into it.
Necessary Equipment
Before we start, it’s important to have all the necessary equipment on hand. These tools will help ensure that the process of separating your shrimp from the plants goes smoothly, reducing stress for both you and your shrimp.
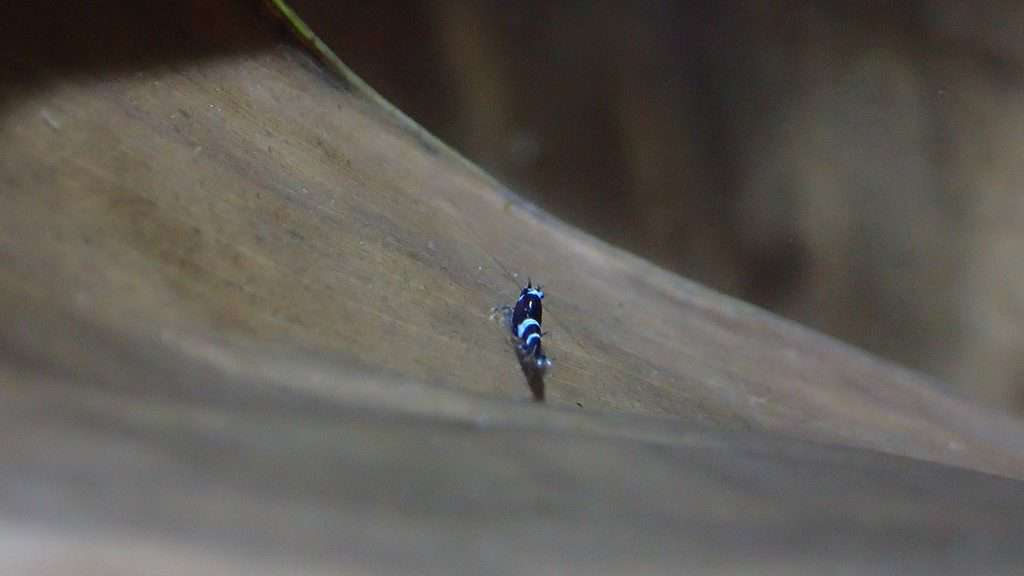
- White Buckets: You’ll need a couple of these. The color is important because, against the white, even the smallest and most transparent shrimp become highly visible. This stark contrast helps you spot shrimp easily when you peer through the water column into the bucket.
- Large Net: This is to transport the plant mass from your tank to the bucket and then to the next one. Choose a net with a decent surface area to comfortably hold your plants and any clinging shrimp during the transfer.
- Shrimp Net: This small net is perfect for scooping up any stray shrimp from the bucket. Shrimp nets are designed to be gentle on these delicate creatures, ensuring that they don’t get harmed during the process.
- Pair of Scissors: To manage overgrown plants, you’ll likely need to trim some of them down. A pair of scissors helps you neatly cut off segments of plants.
Having your equipment ready beforehand not only makes the process faster but also reduces the amount of time your shrimp spend outside their regular environment. This is crucial to their well-being, as shrimp can get stressed when exposed to unfamiliar surroundings for too long.
The Plan
Having laid out our required tools, we’ll now delve into the procedure itself. Here’s a step-by-step breakdown of the plan.
- Water Change: Begin with a water change in your tank. The aim is to extract about 20 liters of water (depending on your tank size) and reserve this water in the two white buckets you have prepared. Preserving the tank water is critical since it’s the environment your shrimp are accustomed to, reducing the shock they might experience from sudden changes in water parameters.
- Remove Overgrown Plants: Identify the plants that have overgrown in your tank and need to be managed. Carefully remove these plants from your aquarium. Be sure to do this gently to avoid disturbing the shrimp or damaging the plant itself.
- Plant Transfer: Place the removed plants into one of the buckets filled with tank water. Let them sit in the water for a few minutes. This time allows any shrimp hiding in the plant to come out in the new environment.
- Manual Shrimp Removal: After the waiting period, transfer the plants by hand into the next bucket. Here comes the crucial part: we need to examine the bucket with the plant to spot any remaining shrimp. You should let the water settle a little bit and then use your eyes and a shrimp net to catch and remove any shrimp left in the bucket.
- Repeating the Process: It’s crucial to note that there will almost always be shrimp hidden within the plants, so repeating this process might be necessary. Even after the second bucket, some straggler shrimp might persist. Therefore, it’s worth repeating the transfer process until no more shrimp are found.
This plan provides a systematic approach to separate your shrimp from the plants effectively. The method involves minimal handling of the shrimp themselves, and by using water from their tank, we make sure they stay within a familiar environment, minimizing the stress induced.
Execution: Step One – Preparing the Water and Buckets
To begin with, you need to conduct a water change in your aquarium. For this method, aim to remove around 20 liters of water, but this could vary depending on the size of your tank. This extracted water will serve a critical function in the following steps, so it’s important not to skip or rush this phase.
As you prepare for the water change, set up your two white buckets. Ensure they are clean and free of any harmful residues or chemicals that could potentially harm your shrimp. It’s also good practice to rinse these buckets with a bit of the tank water before use to make them as safe as possible for the shrimp.
Once you have your buckets ready, carefully remove the needed quantity of water from your tank. The importance of using the tank’s water is to keep the shrimp in an environment with similar water parameters to what they are accustomed to. Changing water parameters abruptly can shock the shrimp, leading to stress or even death in extreme cases.
When you fill your buckets with the tank’s water, it’s essential to leave enough water in the tank to keep your shrimp comfortable and enough water in the buckets to handle the plants.
Thus, the first step involves the careful removal of the tank water and its transfer to the two white buckets. This part of the process establishes the foundation for the entire procedure and ensures that your shrimp will stay healthy and safe throughout the transition.
Execution: Step Two – Removing and Sorting the Plants
Now that you have your water-filled buckets ready, it’s time to attend to the plants in your tank. If your tank is overgrown, you’re going to need to remove some of the excess plants. This not only provides a cleaner, more open space for your shrimp to explore but also makes it easier for you to spot and separate the shrimp.
Start by identifying which plants you want to remove from the tank. Ideally, you should aim to remove overgrown plants, particularly those that are blocking the light from reaching the tank’s bottom. You might also consider removing plants that don’t fit with the aesthetic you’re aiming for or any that appear unhealthy.
Once you’ve determined which plants to remove, it’s time to get to work. Carefully extract the plants from the tank, trying to disturb the surrounding area as little as possible. Remember, your goal is to remove the plants without causing undue stress to your shrimp. Be mindful of the shrimp as you remove the plants, as they can often cling to the leaves or roots.
Now, transfer the removed plants to one of the buckets of tank water. Allow the plants to sit in this water for a couple of minutes. This helps any hiding shrimp come out and swim into the water in the bucket.
Next, manually move the plants to the other bucket, carefully checking each plant as you do so. If you spot any shrimp still clinging to the plants, you can gently nudge them off into the bucket.
This process is a crucial part of separating your shrimp from the plants, as it ensures that you’re removing as many shrimp as possible before moving the plants out of the tank. It’s a delicate balance between working quickly enough to minimize stress to the shrimp and slowly enough to ensure that you don’t miss any hidden among the leaves.
Inspection Time – A Closer Look at Your Buckets
Once you’ve completed the plant transfer, the real detective work begins. It’s time to inspect the buckets for any remaining shrimp. This step is crucial because you don’t want to risk accidentally disposing of any shrimp with the plant material.
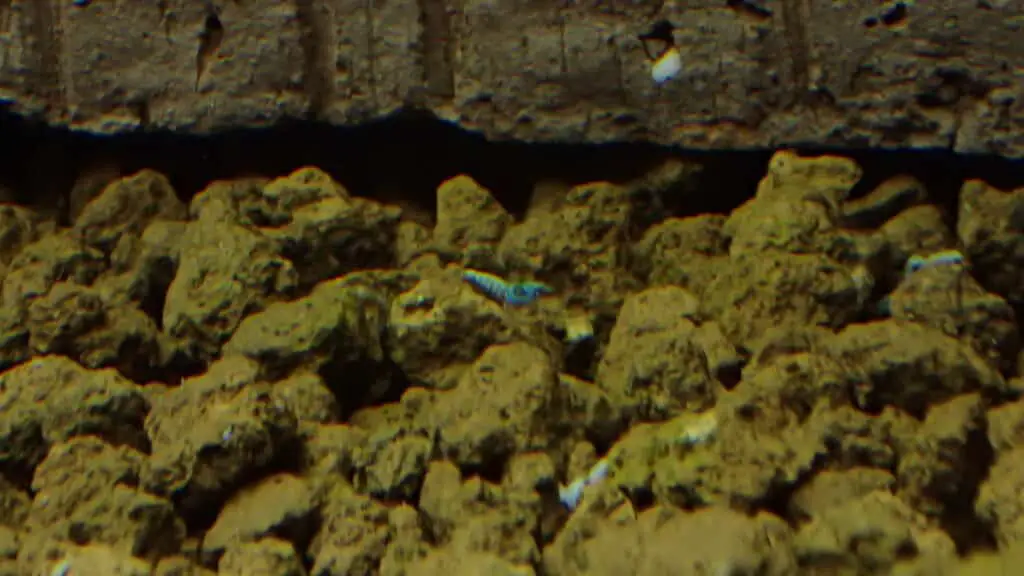
Allow the water in your buckets to settle for a few minutes. Doing so will enable the shrimp to calm down and make it easier for you to spot them. Once settled, carefully peer into your bucket. A flashlight can be particularly helpful for spotting small or transparent shrimp.
You might be surprised at the amount of aquatic life you spot. It’s not uncommon to find snails and other small organisms along with your shrimp. A healthy aquarium is a thriving ecosystem, so this is a good sign that your tank is flourishing.
Remember to inspect both buckets, even the one that held the plants after the initial soaking. Sometimes, the more tenacious shrimp cling onto the plants and might not be dislodged until the plants are moved to the second bucket. Occasionally, you might even find the odd straggler that has managed to hold on into a third transfer.
In cases where there are numerous tiny shrimp, it’s worth doing the whole process twice to ensure that you’ve removed as many shrimp as possible. Once you’ve transferred all the plants back to the original bucket and inspected the second bucket again for any hidden shrimp, you can finally be confident that you’ve separated the shrimp from the plants.
If you do find any shrimp during your inspection, use a shrimp net to carefully scoop them up and return them to the tank. Take this opportunity to count the shrimp you’ve found. This can provide you with a useful estimate of your shrimp population, something that can be challenging to gauge in a densely planted tank.
This detailed inspection is essential to ensure that you’ve successfully separated the shrimp from your plants. The last thing you want is to inadvertently lose some of your shrimp, especially if you’ve been nurturing a breeding colony. So take your time and thoroughly check each bucket, looking out for those little critters hiding away.

The Results – Successful Shrimp and Plant Separation
Following this meticulous process, you will find yourself with two key results: A significantly reduced amount of plant mass in your tank, and a group of saved shrimp that could have been unintentionally discarded.
On the plant side of things, this process allows you to control your tank’s plant density effectively. Overgrowth can sometimes obstruct the light, which is vital for the tank’s overall health. By transferring, shaking, and inspecting, you’re able to selectively remove portions of your plants, ensuring the tank remains a conducive environment for your shrimp and not overwhelmingly filled with plants.
When it comes to the shrimp, you’ll often find that you’ve saved a good number of them just by diligently following this method. Whether they’re adult shrimp or even two-week-old baby shrimp, the chances are high that a significant number would’ve clung onto the plants, easily overlooked if not for this process.
While the numbers can vary, based on the plant mass you’ve removed and the shrimp population in your tank, you can expect to rescue several shrimp that might have otherwise been lost. In a case where about half the plant mass from a tank side is removed, it is not uncommon to save about seven to eight shrimp.
This number could increase with more densely populated shrimp species or with plants that tend to hold more baby shrimp, like hornwort. A variety of aquatic life, including snails and seed shrimp, can also be saved during this process, contributing positively to your tank’s biodiversity.
This method gives you an invaluable opportunity to monitor your tank’s health more closely, allowing you to spot any potential issues early. It also ensures that you maintain a thriving, balanced ecosystem where both your plants and shrimp can coexist in harmony. In short, you’ve achieved your goal: successfully separating your shrimp from your plants without causing any harm to your tiny tank inhabitants.
Conclusion
To sum up, the process of shrimp and plant separation is delicate, yet highly rewarding. With careful execution and patience, you ensure a thriving environment for both your plants and shrimp. This practice enables you to control plant overgrowth, safeguard your shrimp population, and maintain the overall health of your aquarium.
Remember, every step, from the equipment setup to the detailed inspection phase, plays a critical role in achieving the desired result. This method offers a sustainable solution to shrimp keepers and is a proven approach that is both shrimp-friendly and conducive to maintaining a balanced ecosystem in your aquarium.
Should you have any further questions or need assistance regarding this process, please do not hesitate to reach out to me. Your aquarium’s health and the welfare of your shrimp are of the utmost importance. I’m here to assist you in ensuring that your shrimp keeping journey is as rewarding and problem-free as possible.
Happy Shrimp Keeping!
Frequently Asked Questions
Q. Is it necessary to use a white bucket for this process?
A. Yes, it is. The white color of the bucket allows for easy visibility of the shrimp, even the smallest ones. They appear quite clearly against the white background when you look down through the water column.
Q. Why do I need to keep the removed water from the tank?
A. Keeping the removed water from the tank is quite essential as it aids in the process of separating the shrimp from the plants. This water will be used in the buckets where the plants and shrimp are temporarily housed during the separation process.
Q. Can I skip the plant shaking process?
A. No, it’s not advisable to skip the plant shaking process. When you gently shake the plants, it dislodges any shrimp that may be clinging to the plants, ensuring you don’t miss any during the transfer.
Q. What do I do if I still find shrimp in the second bucket?
A. It’s normal to find some shrimp in the second bucket. In fact, it’s advised to repeat the process even a third time, as there might still be some shrimp left clinging to the plants. The goal is to ensure no shrimp is left before the plants are moved to another tank or discarded.
Q. What should I do with the plants after the separation process?
A. If you have too many plants, you can consider composting the excess. However, if you have space, you can also move the plants to another tank, providing more cover and food sources for your shrimp or other aquatic pets.
Q. Why do I need to save the snails and seed shrimp?
A. While it’s not mandatory, saving snails and seed shrimp can be beneficial. These organisms are part of the aquarium’s ecosystem and contribute to its overall health. They help with cleaning by consuming algae, detritus, and dead plant material. Therefore, by saving and returning them to the tank, you maintain a balanced ecosystem in your aquarium.