Cholla wood provides an excellent addition to any shrimp tank. Preparing it properly ensures a safe and beneficial environment for your shrimp. This process involves cleaning the wood, boiling it, and placing it in the tank. But how exactly do we do that?
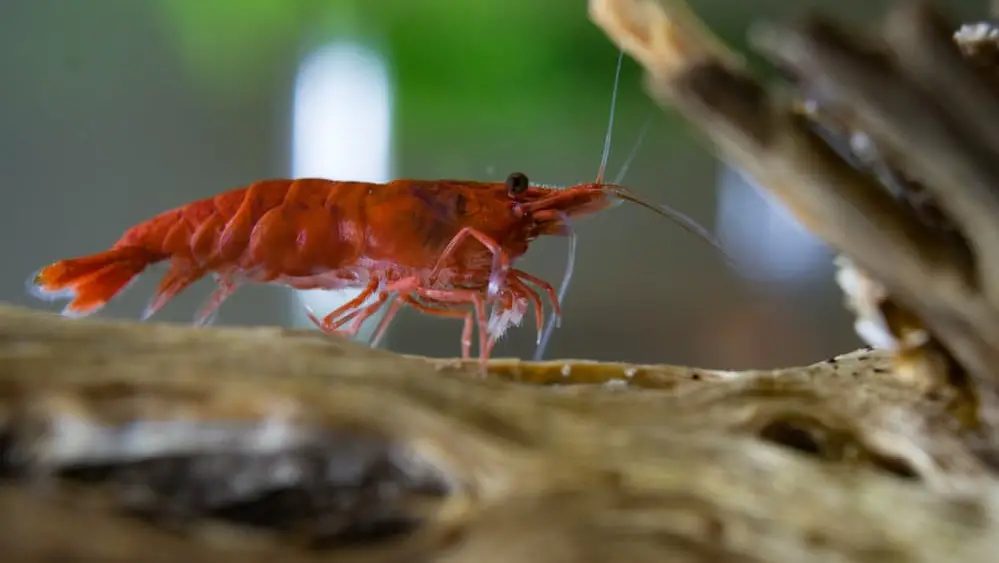
Over my many years of shrimp keeping, I’ve come to appreciate the role of cholla wood in a shrimp tank. Its soft texture and hollow body provide an ideal surface for biofilm growth, a favorite food for shrimp. Plus, it’s a great place for shrimp to hide and feel safe. But before it becomes a shrimp haven, a bit of preparation is involved.
Choosing the Right Cholla Wood
When it comes to shrimp keeping, choosing the right cholla wood is essential. It’s not just about picking up the first piece you come across. It’s about understanding your shrimp tank, your shrimp’s needs, and the role that cholla wood plays in maintaining a healthy environment.
Firstly, consider the size of the cholla wood. The size should be proportional to your shrimp tank. You don’t want a piece that’s too large, taking up too much space, or too small, barely noticeable and not providing enough surface area for biofilm growth. A piece that fits comfortably in your tank and allows your shrimp to freely navigate around it is ideal.
Next, look at the quality of the cholla wood. It should be clean, dry, and free from any pests. Cholla wood, like any natural product, can sometimes carry unwanted visitors. Make sure to source it from a reputable supplier who ensures that it’s pest-free.
Also, consider the shape of the cholla wood. Due to its natural origins, each piece is unique, with different curves, holes, and textures. While this doesn’t impact its functionality, it can affect the aesthetic of your shrimp tank. Choose a piece that complements the look you’re aiming for.
Finally, think about the number of pieces you need. This depends on the number of shrimp you have and the size of your tank. More shrimp or a larger tank might require multiple pieces of cholla wood to ensure that there’s enough biofilm to go around.
Cleaning the Cholla Wood
Just like any other addition to your shrimp tank, cholla wood needs to be cleaned before it’s introduced. Cleaning removes any potential contaminants that could harm your shrimp and ensures that the cholla wood is safe for your tank.
The first step in cleaning cholla wood is a simple rinse. Run it under tap water and gently scrub it with a soft brush. This will remove any loose dirt or debris that might be present on the surface. Make sure to clean inside the holes too, as dirt can often hide in these crevices.
If you’ve obtained your cholla wood from a reliable source, a rinse may be enough. However, if you’re unsure about the origin of the wood or want to take extra precautions, you can proceed to the next step – soaking.
Soaking the cholla wood can help to further clean it and remove tannins, which are natural compounds that can discolor your tank water. To soak the wood, place it in a bucket of dechlorinated water or aged tap water and leave it for a week or two. This will not only help in cleaning but also in waterlogging the wood so it sinks in your tank. If you observe any change in water color, you can change the water during this period.
Now, some shrimp keepers prefer to boil the cholla wood as an additional safety measure. Boiling can kill any potential pests or bacteria present in the wood. If you decide to boil, place the cholla wood in a pot of water and let it boil for about an hour. After boiling, let it cool down completely before proceeding to the next step.
Remember, whether you decide to boil the wood or not is entirely up to you. Some shrimp keepers believe in the benefits of the tannins and microorganisms that come with the wood and opt to skip the boiling step.
Once the cholla wood is cleaned and cooled, it’s ready to be added to your shrimp tank. With these steps, you can ensure that your cholla wood is clean and safe for your shrimp.
To Boil or Not to Boil Cholla Wood
One of the common questions when preparing cholla wood for a shrimp tank is whether to boil it or not. Boiling cholla wood is not mandatory, but it’s a step that many shrimp keepers choose to take for several reasons. However, it’s important to understand the pros and cons so that you can make an informed decision that suits your shrimp tank best.
Boiling cholla wood has its benefits. First, it serves as a safety measure, eliminating any potential parasites, bacteria, or fungus that might be present in the wood. If you’re unsure about the source of your cholla wood, boiling it can give you peace of mind.
Secondly, boiling can help remove a good amount of tannins present in the cholla wood. Tannins are natural compounds that leach into the water, causing it to turn a tea-like color. While tannins aren’t harmful to shrimp and can even create a natural, river-like environment in your tank, not every shrimp keeper appreciates the change in water color. Boiling can significantly reduce the amount of tannins that leach out.
On the other hand, not boiling cholla wood has its own advantages. Tannins, though they change the water color, have beneficial properties. They can lower the pH of the water, making it more suitable for certain types of shrimp. Tannins also have anti-fungal and anti-bacterial properties, which can contribute to the overall health of your shrimp tank.
In addition, some shrimp keepers believe that the biofilm, which shrimp love to eat, develops better on unboiled cholla wood. Biofilm is a layer of microorganisms, including bacteria and algae, that forms on surfaces submerged in water.
Anchoring Cholla Wood in the Tank
Once your cholla wood is clean and ready, it’s time to introduce it to your shrimp tank. But there’s a little challenge you might face – cholla wood is buoyant and tends to float when first placed in water. Here’s how you can anchor cholla wood in your tank.
One of the simplest ways to anchor cholla wood is by soaking it until it sinks. This could take anywhere from a few days to a couple of weeks, depending on the size and density of the wood. Simply place the cholla wood in a bucket of dechlorinated water and wait. Over time, the wood will absorb enough water to sink on its own.
If you’re not keen on waiting, you can try weighing the cholla wood down. You can do this by attaching it to a heavier object, such as a piece of slate or a ceramic tile, using aquarium-safe glue or thread. The weight of the object will keep the cholla wood submerged.
Another trick that some shrimp keepers use is filling the hollow sections of the cholla wood with small stones or pebbles. The extra weight can help the cholla wood sink. Once the wood is waterlogged and stays at the bottom, you can remove the stones if you wish.
Adding cholla wood to a tank with some water already in it can help too. The existing water will slow down the wood’s descent, reducing the chance of it floating back up.
Lastly, remember that positioning is key. Try to place your cholla wood in a way that it won’t topple over or disrupt your tank setup when it eventually sinks.
Adding Moss to Cholla Wood
Adding moss to cholla wood can create a wonderful environment for your shrimp. The moss offers additional surface area for biofilm to grow, providing a rich food source for your shrimp. Plus, it adds a beautiful, natural aesthetic to your tank. Here’s how you can add moss to cholla wood.
Before you begin, ensure that you’ve chosen the right moss for your tank. There are various types of moss suitable for shrimp tanks, like Java moss, Christmas moss, or weeping moss, among others. Each type has its own care requirements and growth patterns, so choose one that fits well with your tank conditions.
Start by preparing your moss. Rinse it gently under dechlorinated water to remove any potential contaminants. Next, take a small portion of the moss and spread it thinly over the surface of the cholla wood. The idea is to encourage the moss to attach and grow onto the wood, so you don’t need a thick layer.
Now, to attach the moss to the cholla wood, you have a couple of options. You can use an aquarium-safe glue to stick the moss onto the wood. Apply small dots of glue on the wood and press the moss onto it. Make sure to use a glue that’s safe for your shrimp.
If you prefer not to use glue, you can use thread or fishing line to tie the moss onto the cholla wood. Wrap the thread around the wood and moss several times until it’s secure. The thread will not harm your shrimp and will eventually decompose once the moss has attached to the wood.
Place the cholla wood with the attached moss into your tank. Choose a location with appropriate light for your moss type. Over time, the moss will grow and cover the cholla wood, creating a beautiful mossy haven for your shrimp to explore and graze on.
Monitoring Water Changes After Adding Cholla Wood
Introducing cholla wood into your shrimp tank can have an impact on your water parameters. It’s essential to monitor these changes to ensure the health and well-being of your shrimp. Here’s what you need to know about monitoring water changes after adding cholla wood.
Firstly, cholla wood, like most types of driftwood, releases tannins into the water. Tannins can stain your water a tea-like color, but this is completely harmless to your shrimp. In fact, tannins can offer benefits such as anti-bacterial properties and pH-lowering effects. However, if you prefer clear water, you can perform regular water changes or use activated carbon in your filter to remove the tannins.
Besides tannins, cholla wood can also slightly lower the pH of your water over time. This can be beneficial if you’re keeping species of shrimp that prefer slightly acidic water. However, if your shrimp species prefer a higher pH, you may need to monitor this closely and take steps to buffer the pH if necessary.
When adding cholla wood to your tank, it’s a good idea to increase the frequency of your water testing for a few weeks. Keep an eye on parameters such as pH, ammonia, nitrite, and nitrate levels. Any significant changes could indicate that something’s not right, and you may need to take action.
Maintaining Cholla Wood in a Shrimp Tank
Cholla wood is a fantastic addition to a shrimp tank, offering both aesthetic appeal and functional benefits. However, like all elements in your tank, it requires some maintenance to ensure it remains a healthy part of your shrimp’s habitat. Here’s how to maintain cholla wood in a shrimp tank.
Firstly, it’s important to observe the condition of the cholla wood regularly. Over time, cholla wood will start to decompose in water. This is a natural process and can even be beneficial as it contributes to the growth of biofilm, a favorite food source for shrimp. However, if the wood becomes too soft or starts to disintegrate, it may need to be replaced to prevent it from affecting the water quality.
Next, watch out for any unusual growths on the cholla wood. While algae and biofilm are normal and beneficial, the appearance of fungus or mold can be a concern. If you spot any white, fuzzy growths on the wood, it might be a type of water mold. While this is generally harmless to shrimp, it can be an eyesore. You can remove it by taking the wood out of the tank and gently scrubbing off the mold under dechlorinated water.
Remember to keep an eye on the water parameters in your tank. As previously mentioned, cholla wood can release tannins and lower the pH of the water. Regular testing of your water can help you catch any drastic changes and address them promptly.
Beware of Snails Getting Stuck in Cholla Wood
While cholla wood can be an excellent addition to a shrimp tank, it’s also crucial to consider the other inhabitants of your aquarium. If you also keep snails in your tank, there’s a small caveat you should be aware of. Here’s what you need to know about snails and cholla wood.
The hollow, tube-like structure of cholla wood is a great attraction for snails. They enjoy exploring and feeding on the biofilm that grows on the wood’s surface. However, if the cholla wood’s holes are too small, snails can sometimes get stuck in them. This can potentially lead to the snail being trapped and unable to free itself, which can cause stress or even death.
To prevent this unfortunate situation, always consider the size of your snails when choosing cholla wood for your tank. Ensure the diameter of the holes in the cholla wood is significantly larger than the size of your snails to give them ample space to move in and out freely.
If you already have smaller cholla wood pieces in your tank, and you’re introducing snails, keep a close eye on their interactions with the wood. If you notice a snail has gotten stuck, you can gently remove the snail with a pair of soft tweezers.
Conclusion
Preparing cholla wood for your shrimp tank might seem daunting, but it’s straightforward. Choosing the right piece, cleaning it, deciding whether to boil it or not, and then placing it in the tank are all steps that require some knowledge and patience. But the result is worth it – a thriving shrimp habitat and a visually appealing addition to your tank. Happy Shrimp Keeping!
Frequently Asked Questions
1. What is Cholla wood?
Cholla wood is the skeleton of a cholla plant after it dies. It is porous and hollow, making it a great addition to a shrimp tank.
2. Why use Cholla wood in a shrimp tank?
Cholla wood provides a surface for biofilm growth, which shrimp love to eat. It also offers a safe hiding place for shrimp.
3. How do I clean Cholla wood before adding it to the tank?
You can rinse Cholla wood with water to remove any dirt or debris. Some shrimp keepers also boil the wood as a safety precaution, but this step is optional.
4. Does Cholla wood affect the water in my shrimp tank?
Cholla wood can leach tannins into the water, slightly discoloring it and lowering the pH level. This effect is beneficial for shrimp and can be adjusted with water changes if necessary.
5. Can I attach moss to Cholla wood?
Yes, moss can be attached to Cholla wood using shrimp-safe glue. The moss provides additional surface area for biofilm growth.